How to Send A Mail Merge In Gmail
Gmail is a great tool for managing your emails. You can add labels, stars or even create multiple inboxes to sort your mail. One thing that is useful, but not supported by default is the mail merge feature. For those who have not heard of mail merge, it means you can send personalized email (with a general template with custom name and info) to everyone in your email list. The good thing is, with a little help from Google Docs (now known as Google Drive) and Google Script, you can now easily create and send a mail merge in Gmail.
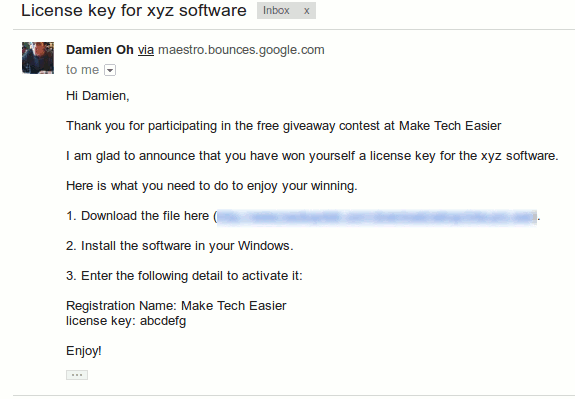
1. Create a template email in Gmail. You can either save it as a draft or as a canned response. In the template email, replace the terms that you want to personalize with “$%terms%”. For example, if you want to personalize the name of the email, replace the name with “$%Name%” or “$%first_name%“. Below is a screenshot of the template email that I use for notifying winners of our giveaway event.

1. Create a template email in Gmail. You can either save it as a draft or as a canned response. In the template email, replace the terms that you want to personalize with “$%terms%”. For example, if you want to personalize the name of the email, replace the name with “$%Name%” or “$%first_name%“. Below is a screenshot of the template email that I use for notifying winners of our giveaway event.
2. Next, open Google Drive and create a new spreadsheet. In the first row of the spreadsheet, insert the terms that you use in the Gmail template. At the last cell, insert another field call “Email Address”.

3. Populate the spreadsheet with the detail of your sendee.

4. The next thing we are going to do is to add a Google script that will merge the content from the spreadsheet to Gmail and send the email out. On the Spreadsheet, go to “Tools -> Script Gallery”. In the pop-up window, search for “mail merge”. There are several mail merge script that you can use, but the one we are using for this tutorial is “Yet Another Mail Merge”.

Scroll down to the end of the list till you locate it. Click Install. Google will then prompt you to grant access to the script. Once that is done, it will bring you back to the Spreadsheet. You should now see a new “Mail Merge” option in the toolbar.
Click “Mail Merge -> Standard Merge”. A window will pop up to prompt you to select the template. Click on the template that you have created and saved earlier.

Click “Send Mails”.
That’s it.
This is the end result:
After the mail merge, you should see a new column “Merge Status” in your spreadsheet. This should inform you if the mail merge is successful for each recipient.
Save and Recycle
Now that you have completed your mail merge, you can save the spreadsheet so you can reuse it in the future. A point to note is that for future usage, you will need to remove the whole “Merge Status” column before you perform a new mail merge.
The mail merge will also work with Google Apps or any other email address that you have associated in Gmail.
As mentioned earlier, there are plenty of mail merge scripts available in the Script Gallery. Some come with more complicated features not found in others. You can try out each and every one to see which one is the best for you. If you are proficient in javascript, you can also create your own Mail Merge script in the Google Script Editor and customize it to suit your needs.